Runscope is a very modern and intuitive tool which comes handy in api testing. Apart from providing UI for sending requests and getting responses, it has a comprehensive set of add ons which are very helpful for testing.
You can schedule tests and run them from multiple locations. You can also set it to mail you the test details post completion of a test. These are few of the many features Runscope has to offer. Lets get started exploring it.
Once you have registered yourself and signed in, there will be your bucket where you will be keeping all your work. The bucket name is displayed in top left corner. You can create as many buckets as you need. The landing page looks somewhat like the image below.
Landing page
We will be exploring API Tests tab in this article. Lets get started and create a new test. Click on the “create test” button on your left pane. When prompted, provide a name and description of your test and click on “create test” button.
You have now created your test, its time to add steps to your test and it looks like the image below.
Test page
Click on “Add request” link to add a few requests to your test. In the “Add request” window you can choose your preferred method for the request and paste your API in the space provided. You can provide authentication and header info in the fields. This should appear somewhat like this.
Add request widow
You can add assertions to your tests by clicking on the ‘assertions’ link on your dashboard. There are several assertions and you can choose the one that suites you. Once you are done with this, you can save your test and run it.
The tests can be also scheduled to run automatically in definite time intervals. Click on the ‘Schedule’ link on the left pane and select the interval that suites your case. This is how the Schedule window looks like.
Schedule
You can turn on email notifications about your tests. There are several options like receiving notifications in case of test failure or test completion, etc. This feature lets you know instantly if your API goes down.
Notifications
You can also integrate your tests with many services like pagerduty, slack, etc and get notifications about your tests and also trigger tests remotely. Alternatively you can use the trigger URL to start tests remotely which you can find under ‘Settings’ in your left pane.
This was a heads up of how to get started with Runscope and there is a lot more you can explore on yourself.
Thanks for reading through the article and hope you liked it.
The term REST is an abbreviation to Representational State Transfer. It is one of several architecture styles in which software systems are designed. It is not a W3 standard as SOAP and is easier to use. All REST communications are stateless and use common HTTP methods. Everything is represented by a unique ID or a uniform resource identifier. Further discussion on REST is beyond the scope of this article.
Testing RESTful APIs with soapUI:
Now when we have the basic understanding of REST, it’s time to get started with testing some REST APIs. We have a lot of freely available REST APIs to play around. Lets use google APIs as they are RESTful and free to use. We will be using google directions api for the sake of understanding and simplicity. Lets get started.
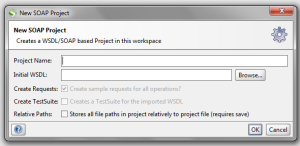
Click on ‘File’ on the top left corner and then select ‘New REST project’
Now the New REST Project window appears and asks for a URI as shown in the image below.
Now you should see a request editor something like the image below.
In the above image, we see a methods dropdown where we have selected GET. This dropdown has all standard HTTP methods as discussed previously. We have selected GET as we only want to retrieve data. The endpoint is the base URI we provided while creating the project. Now we come to the important part which are the parameters. We can get all the parameters from the api documentation. For now we will be using few basic parameters like origin and destination. We also see that there is a parameter called format already present, we need to change its value to json/xml. In order to add a new parameter click on the button shown in the above image. Add relevant values to your parameters and save. Now the request editor appears like the image below.
Now run the request and we get the directions from origin to destination as response.
We can now add assertions and design test cases in a similar way as we did for SOAP so as to meet our requirements.
In my previous blog, we discussed load testing basics using soapUI, now lets us discuss a few assertions which really come handy while load testing any web service using soapUI.
There are five assertions that can be used while automating a load test in soapUI.
They are:
Step status
Step average
Step TPS
Max errors
Step Maximum
Load test assertions can be added by clicking on the add assertions tab on the load test editor. There after toy can click on add new assertion icon and select the required assertion.
Let us go through each one of these in detail.
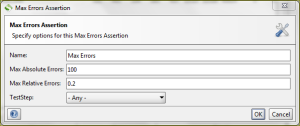
Max Error Assertion
This assertion has two parameters, max absolute errors and max relative errors. The parameters associated are:
Max absolute errors – This is the maximum number of errors allowed for a particular test step.
Max relative errors – This is the relative maximum errors allowed to occur. E.g. if the value is set to 0.2, then the maximum allowed errors are 0.2 X Max absolute errors.
This assertion prompts when the total errors occurred are more than the max absolute or max relative errors .
Test Step Average Assertion
This assertion asserts the average step time of a test step/case. There are several parameters for this assertion like:
Name – Can be anything based on the convenience of the user.
Minimum requests – This is the minimum number of steps before asserting.
Max average – This is the maximum allowed average step time. Assertion error occurs if the actual value is greater than max average.
Max errors – This is the maximum number of allowed errors beyond which the load test fails. The default value is -1 which is equal to unlimited.
Sample interval – This is the step count interval between sampling. For example if it is set to 10, assertion will be applied to the test step in every 10 second interval.The assertion fails if the step average is more than the max average.
Step TPS Assertion
This assertion checks if the actual TPS for a step goes below the defined value. TPS here stands for transactions per second. Parameters for this assertion are:
Minimum requests – This is the minimum number of steps before asserting.
Minimum TPS – This is the minimum required step TPS.
Max errors – This is the maximum number of allowed errors beyond which the load test fails. The default value is -1 which is equal to unlimited.
Step Maximum Assertion
This assertion is useful for asserting a test step’s maximum response time. The parameters associated with this are :
Minimum requests – As discussed earlier, this is the minimum number or steps before asserting.
Max time – This defines the maximum allowed response time for a test step or test case. An error is logged if the actual response time exceeds the max time specified.
Max errors – As discussed earlier, this defines the maximum number of errors before failing the load test.
Step Status Assertion
This is an assertion added to all the load tests by default. The execution status of a test step/case is verified using this assertion. The associated parameters are:
Minimum requests – This is the minimum number or steps before asserting.
Max errors – This defines the maximum number of errors before failing the load test.
So that was all about load test assertions in soapUI.
Hello people, I am back with yet another interesting blog on soapUI. Testing of web services cannot be considered to be complete by just testing the functional aspect of a web service. What good is a web service if it is not able to cater to the needs of those several applications requesting its services at a time, irrespective of great design and architecture? A web service should be built tough and robust to handle huge traffic and not just functionally stable. And for this purpose, the web service should undergo a thorough round of non-functional tests. This non-functional testing is usually carried out by tools designed for the purpose. SoapUI is one such open source tool for testing the performance of web services.
SoapUI has got some really nice features which make it our go to tool for load testing of web services.
If you have been using soapUI for functional testing, then you need not create separate test cases for load tests. Also it has some default testing plans laid out for us for the ease of testing.
Performance issues with web services can be due to poor architecture or the middleware component or message routing issues. SoapUI can help us simulate many real word scenarios / test cases for our testing. Without wasting time, let’s start with a demonstration. We will be using a weather service for our testing purpose this time. We will load test the following WSDL, http://wsf.cdyne.com/WeatherWS/Weather.asmx?WSDL. Create a new project as discussed in my previous blog and name it as per your convenience. Add a new test case and below the test case find the ‘load test’ node. There, right click and add a new load test. SoapUI creates a new load test for you with default values. Click on the newly created load test to open the detailed view. The window should appear something like this:
Figure 1
As I said earlier, soapUI creates a load test with some default strategies and values, so for the sake of a simple start, lets just click on the green run button present at the top-left corner. Once the test has run, this is how the window looks like.
Figure 2
Before going deep into load testing using soapUI, there are a few thing we need to know.
Limit:
The limit of a load test it nothing but its execution interval. It has two variables that need to be set for testing. The first one is ‘limit value’ and the second one being ‘limit type’. Limit type can be selected from the dropdown from among Total Runs, Seconds and Runs per Thread.
Figure 3
Total runs: is the number of times we need our test case to be executed for one single load test run. To put in a simple sentence, if X is the value of total runs, the test case will be executes X times per load test run.
Seconds: This is quite simple limit type. This is time duration in seconds for which the load test will run. Like if we set limit to 60 seconds, the load test will run for 60 seconds.
Runs per thread: This again is simple, as the name suggests, the test will run the number of times set in the value multiplied by the the number of threads set. Which means if you set the limit value to X and the number of threads is Y, then the test will run X*Y times.
Threads:
Threads are nothing but the virtual users which soapUI simulates for carrying out load tests. Which means, the number of threads is equal to the number of virtual users.
Strategy:
SoapUI comes with certain strategies for us to simulate several real life scenarios. Each strategy has its own set of parameters. Let’s discuss these strategies in detail.
Figure 4
1. Simple: The simplest of all, this is the default strategy of a load test. Here ‘test delay’ is the delay between two test runs, its unit being millisecond. ‘Random’ is relative randomization. This load test strategy is good for benchmarking a web service.
2. Burst: As the name suggests, this strategy is used to develop a sudden load on the web service. The parameters for this strategy are ‘burst delay’ and ‘burst duration’. ‘Burst delay’ is the period between two bursts, when soapUI does not send any request to the web service. During ‘burst duration’ soapUI targets the web service with heavy traffic. Put up some values for the parameters and give it a go. See the results.
3. Thread: This is a useful strategy if you want to simulate increasing number of users using the system within a specific time. The parameters associated with this strategy are ”Start threads’ and ‘End threads’. The test starts with the number of users we put in start threads and ends with the number of users we have input in end threads. Over the time, there is a gradual increase in virtual users or threads.
4. Variance: This strategy is used to simulate variable number of threads during the test run duration. Parameters associated are ‘interval’ and ‘variance’. ‘Interval’ is the interval between variance and ‘variance’ specifies magnitude of variance. The thread count varies while the test is running based on the variance value we have set.
We can create a sequence of load tests of each strategy and run them sequentially for a complete load test suite.
More is coming on load testing in my next blog, stay tuned.
Test suites are nothing different here in soapUI and are similar to those in any other testing tool. Test suites are hierarchically divided here in soapUI. A test suite may have several test cases and a test case in turn may have several test steps. Lets get started with creating test suites in soapUI. Let us consider a new web service here which is a temperature unit conversion service. The wsdl for the same is http://www.webservicex.net/ConvertTemperature.asmx?WSDL. Create a new soap project as described in the earlier blog, name it “temperature conversion” or anything you like and add the above wsdl to it.
Now the view of the workspace will be like the figure shown below.
Image 1
Now click on ‘Request 1’ to open the request editor. Replace the question marks with suitable values. Like the temperature should be a numerical value, ‘FromUnit’ and ‘ToUnit’ should be ‘degreeCelsius’ or ‘degreeFahrenheit’ or other temperature units in similar format. See the service description of the wsdl for other units supported. Run the request to see the conversion result.
Now suppose we want to create a test case, we can click on the button next to the run button on the request editor. See the image below.
Image 2
After clicking on the button, a dialog box appears which asks for the name of the test suite. Provide a suitable name for your test suite and click on OK. After clicking on OK, another similar dialog box appears asking for the name of the test case you want to create. Provide a suitable name for the test case and click on OK. Now another dialog box shall appear which looks like the image below.
Image 3
This is the “add request to test case” dialog box. For now lets go with the default settings, just click on OK and the first suite and test case are created. The work space now should look somewhat like the image shown below.
Image 4
You can see there is a test suite in which there is a test case. In the test case there is a test step where our current request exists. You can modify the test case by clicking on the test step editor which is highlighted in the above image. You can add as many test steps you want per test case and as many test cases per test suite. Try your hands on by adding a few more test cases and test suites.
Assertions
Assertions are an important part of test cases, aren’t they? The help us determine if the result is same as that of expected result or is it something different. Thus helping us In determining whether the test has passed or not. You can add assertions to your test steps in soapUI as well. Any number of assertions can be added to a test step and a test step fails if any of the assertions fails. There are some predefined assertions in soapUI which we will be discussing now.
1. Contains assertion:
The ‘Contains assertion’ scans the response message for the expected value and if found, the assertion passes. If the expected value is not present in the response message, the assertion fails. The regular expression for the same is in the format (?s).*(“expected value”).* . But for most strings, the value can be directly written in the fields as plain text. Let us see how the contains assertions can be added to a test case. Open the test case editor by clicking on the ConvertTemp Request 1 as shown in the image 4. The button next to ‘run’ is the ‘add assertions’ button. Click on the button to see various assertions of soapUI. The ‘add assertion’ window appears like the image shown below.
Image 5
From the left hand pane, select ‘Property Content’ and see a list of assertions under this category. Select ‘Contains’ assertion and click on ‘Add’ button. The ‘Contains Assertion’ dialog box appears like this.
Image 6
In the content field, add the string you expect to be present in the response message. In this case, we are sending the temperature as 100 degrees Celsius and are requesting it in Fahrenheit unit. So as per the temperature conversion formula, temperature in Fahrenheit = (temperature in Celsius * 9/5) + 32.
Therefore 100 degree Celsius is equal to 212 degree. So we can add an assertion that the response message should contain the string 212. So simply write 212 in the content field and click on ‘OK’. Now when we run the test case, we see that the assertion has passed because the response message contains the string 212. You can also write the regular expression but be sure to check the check box shown in the above image.
2. Not Contains assertion.
‘Not Contains’ assertion is similar to Contains assertion. The difference here is that the assertion will pass if the string token you entered as expected value, is not present in the response message. The assertion fails if the expected value is present in the response message. The regular expression is similar to that of the ‘Contains’ assertion. It can be added in a similar was just like the ‘Contains’ assertion.
3. Not SOAP Fault assertion.
The ‘Not SOAP Fault’ assertion checks if we get a valid soap response instead of a soap fault. In case there is a soap fault, the assertion fails. If the response is valid, then the assertion passes. It can be added just like the other assertions. There are no parameters or values to be passed with this assertions as it only checks if the response is valid or not. Add a ‘Not SOAP Fault’ assertion to the test case and rerun the test case with the previous values. See that the assertion passes. Now let us see the condition where the assertion fails. In the test case editor, pass some random values. Like we can pass ‘F’ in the FromUnit and ‘C’ in the ToUnit. When we run the test case again, we see that the assertion has failed as the response is a soap fault.
Image 7
4. SOAP Fault assertion.
The ‘SOAP Fault’ assertion is similar to the ‘Not SOAP Fault’ assertion. The difference is that the assertion passes if there is a soap fault and fails if there is no soap fault. It can be added in the same manner as the ‘Not SOAP Fault’ assertion is added.
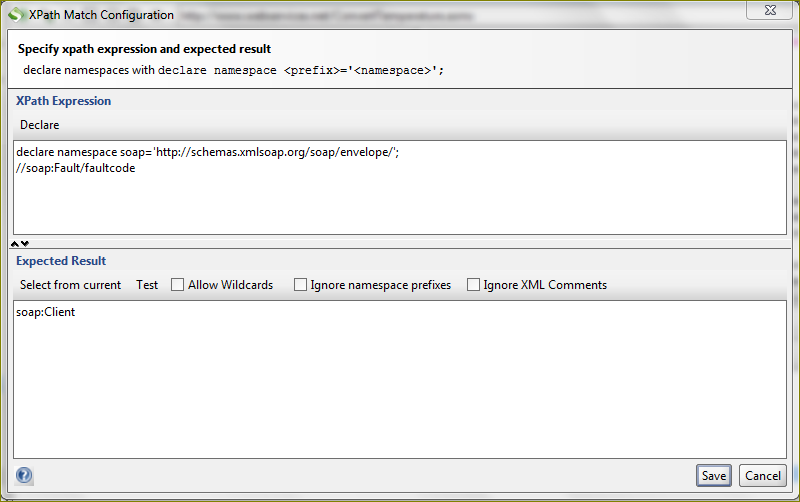
5. XPath Match assertion.
This assertion is used to compare the result of an XPath expression with a predefined value. We can check the ConvertTemp response if it has the expected fault code or fault string in case there is a soap fault. This assertion is present under the ‘Property Content’ assertions. Now select the assertion and click on ‘add’ button. The XPath Match configuration window appears. Here we need to declare the namespaces before we using any expression. In this case we do it as :
Alternatively, soapUI does the declaration of namespaces for us if we click on the ‘declare’ button as shown in the image below.
Image 8
In the expected value, we write the value of the ‘faultcode’ nodes as see in the image 7. So the expected value here is ‘soap:Client’. This is how an ‘XPath Match assertion’ is added.
There are a lot more assertions and you can explore through all those to have a good grip on them.
This was some basic know-how on test cases and assertions in soapUI. Hope this helps.
In this age, information exchange is of prime importance and web services provide for this message exchange from application to application. Web services serve as vital constituents for service oriented solutions and are extensively used in enterprise applications.
SOA and web services:
A web service is the method of communication between two devices over the internet or World Wide Web.
Service Oriented Architecture is an approach to build enterprise solutions using loosely coupled and reusable components.
The building blocks of SOA are web services, mediation and composition.
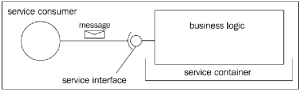
The individual units of business logic in SOA are the web services. They communicate with other programs and applications by sending messages. The web service is hosted in a service container which is the middleware in SOA.
The business logic is hosted in the container and is accessible through the service interface as seen in the diagram above.
In mediation, the received message undergoes transformation as necessary. Then this transformed message is fed to the system. The SOA middleware for message mediation is a broker, the usual one being Enterprise service bus.
Composition refers to use of several web services together to facilitate a business functionality.
SOAP and WSDL:
The Web Service Description language or the WSDL is an interface description language based on XML. It describes the functionality offered by the web service.
Simple Object Access Protocol or SOAP is a language independent, platform independent communication protocol for exchanging messages over the internet. This too is based on the standard XML.
Introduction to soapUI:
Now what is soapUI? As the name suggests, this tool provides the UI or user interface to test the web services and soap requests/response. This is an open source tool with a pro version available for advanced features. For now let us restrict ourselves with the open source version. soapUI is capable of performing both functional and non-functional tests on the web service. Further details on soapUI can be found at http://www.soapui.org.
Installing soapUI is quite straight forward and simple. Install it with the general recommended settings for now.
Trying your hands on soapUI on Windows:
Now as you have installed soapUI on your system, lets get started with a very simple project to give you a brief understanding on how things work. We will consider a weather forecast web service exposed on the internet for our demo project. The wsdl for the same is http://www.webservicex.net/globalweather.asmx?WSDL.
Once soapUI opens, go to file menu on the top left and create a new soap project. When the create new project pop up appears, provide a desired name and in the field below where the wsdl is required, provide the one mentioned above. Note that it is not mandatory to add a wsdl initially to your project. After adding the wsdl to the field, just click “OK” without making changes to the default settings for now.
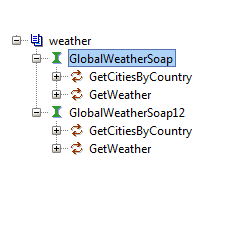
After this is done, you should be able to see on the left hand side there is a tree of the project as shown in the figure below.
In this figure we see there are two soaps namely GlobalWeatherSoap and GlobalWeatherSoap12. These are nothing but the soap binding versions. Let us focus on the former one for now. Here we see the following services which are GetCitiesByCountry and GetWeather. Let us select any one service, lets us say GetWeather. Click on the tree to expand the service. The view should look like the image shown below.
Now double click on the soap Request1, upon doing so, a request response editor shows up as shown in the image below.
The left editor is the request editor and the corresponding response is displayed in the right pane.
In the set of code in the request editor, you should be able to see two question marks like this ‘?’ within the CityName and CountryName tags. Replace these with a set of proper values and click on the green play button on the top left corner of the editor to run it. I have entered the city name as “New Delhi” and country name as “India”. The subsequent response pane should look like this.
Here we see that the request we sent fetched a proper response, in our case the weather of New Delhi was displayed. However we are not judging the accuracy of the weather data we get in the response pane. Now try some random and inappropriate values in the request editor and run.
The response for inappropriate values will result in a response shown below.
There occurs a soap fault due to inappropriate values which were not found in the service database. The resulting fault string is being displayed in the response pane.
Creating test cases and test suites and further topics will be covered in the coming blog posts. Hope you have enjoyed and learnt so far.